Monday, June 30, 2008

LRG Complete 2.5.6

Another maintenance release that adds more functionality, Lightroom Galleries is continuing to provide features asked for in the forum. Get involved. Download a copy today and post some feedback.

This new version has expanded international language support and adds more settings for the placement of images on a page.

LRG Complete provides a total solution for using E-Commerce to sell your images online integrating with PayPal, Google Checkout and simple Email Orders. Your choice!

You can get a copy of the Web Gallery at Lightroom Galleries. ... Read More!

Don't forget to visit my photography web site where we sell museum quality black and white prints framed to last up to 175 years - Outdoor Images Fine Art.

Film Grain and GEM

This is part of my Scanning Images Workflow and the settings used on my negative to digital image scanner.

Film Grain and GEM

Film grain is similar to noise present in a digital image from a CCD. Film grain isn't as noticeable in slower speed films and small print sizes. However, any sizable print or high speed film has a tendency to show the sand like grain of the film. While many noise reduction programs work well, GEM is most commonly found in negative and slide scanners, so we will discuss the use of GEM in our film to digital workflow.

GEM or Digital GEM, was developed by Kodak for use with Adobe Photoshop and a variety of film scanners. The Nikon CoolScan Scanners carry GEM as part of their included scanning software. The concept is to view the grain through each of the three color layers and then remove that grain information from the digital image while keeping the detail. Kodak indicates that removing the grain effect while keeping the color shades and details will help 35mm film rival the larger format cameras. While larger format negatives have details surpassing 35mm, the GEM product has the ability to assist in grain removal that does enhance any size enlargement of a 35mm image.

Specifically, the GEM algorithums work well with scans of color negatives and slides. However, our focus is on the black and white negative. All of our comparison scans originate from Ilford HP5 black and white film exposed at 400 ASA and developed with Ilford Ilfotec DD-X fine grain developer. The scans were made with a Nikon CoolScan 5000 using the negative attachment. Scans were made at 4000 dpi and 16bit greyscale TIFF images were saved resulting in 40mb files. These image files were imported into Adobe Lightroom and compared side by side. The results are below.

GEM Zero - No GEM

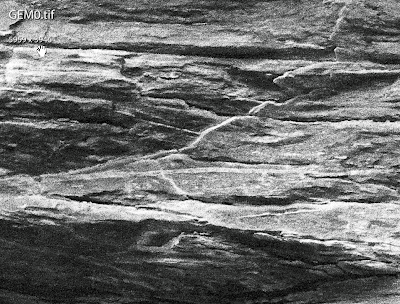
The image below shows a native scan with GEM turned off or set to zero.


Notice how spotted the image is. This view is from Adobe Lightroom at a ration of 1:1 and encompasses the rock outcropping that is part of a waterfall. Let's see what some added GEM processing will accomplish.

Gem 4 - All the Way

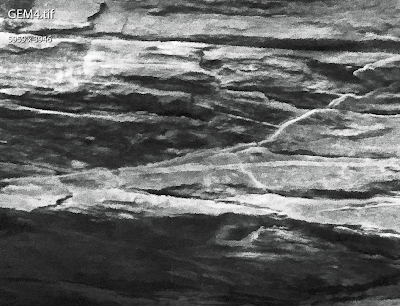
Rather than stepping through the settings on the Nikon CoolScan 5000, let's see the most processing that can be enabled. The image below represents GEM processing at level 4 or the most available through the Nikon CoolScan.


Notice how the image looks a little less crisp, but much less spotty. This is the maximum grain removal for black and white films. The comparison is in the fine details to see if a little sharpening can bring them back out.

Compare GEM 0 to GEM 4

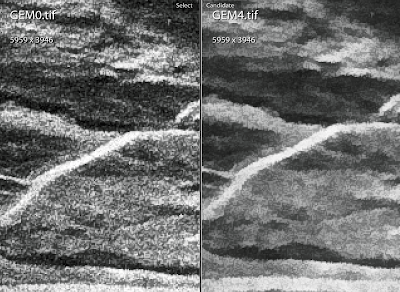
Let's compare the native scan with a GEM 4 scan side by side to see what differences are apparent. The following image was made through Adobe Lightroom while comparing the two images above.


Notice how the contrast between the grain is lowered to match the surrounding pixels. This comparison was done at a ratio of 3:1, or three pixels on the screen to match one image pixel. The results are much more dramatic at this magnification.


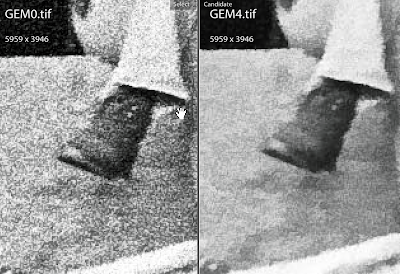
Here is the same image, at the same 3:1 magnification, but the viewing area is of a hiking boot. Notice how the highlights of the boot laces are muted in the GEM 4 processing image. Thus, the loss of contrast in the grain is apparent and will help some images improve immensely while some details will begin to fade away as well. Sharpening my not be enough to bring those details back.

Gem 0 versus Gem 2 - A Little Processing

See the image below where the same boot area is compared, but using Gem 0 versus Gem 2, or about 1/2 processing.


Notice here how the contrast is lightened somewhat compared to the native scan, but that the boot lace detail is still visible and has plenty of contrast. In these extreme detailed settings, a higher GEM setting can actually hurt more than help.

Sharpening Workflow

While there are no examples here of the effects of sharpening after using the GEM processing, the level of contrasting details will have a noticeable effect on the sharpening outcome. The larger the output, the heavier the sharpening may be. Careful integration of this grain management must be used with your current sharpening techniques. The best text, by far, I have ever encountered on Sharpening is Image Sharpening for Adobe Photoshop by Bruce Fraser.

Conclusion

GEM is a tremendous tool to reduce the effect of noticeable grain. If used carefully, a mix of lower contrast between grain particles, but no noticable lack of detail can be achieved. However, full blown GEM 4 settings can result in some lost detail if not careful.

For most images I use a GEM setting of either 1 or 2 depending on the scene. The Nikon CoolScan settings are saved so that I can pull them up quickly and use the same settings over and over. For images that are extremely important, a quick test of the GEM setting for that image may be necessary.

There have been very few cases in my black and white scanning where I found GEM 3 or GEM 4 produces pleasing results. I have not done extensive tests in RAW files, so I do not know if the color layers behave differently. Using a light GEM setting is better than no GEM setting at all. The best solution for grain management is the best exposure coupled with meticulous development techniques. Thus, GEM is not a cure for poor photography, but GEM will assist in converting negatives to digital images.

NOTES:

The GEM settings discussed here are based on the 0-1-2-3-4 settings of the Nikon CoolScan scanning software that accompanies the scanner. Other software may have different levels of GEM processing that do not coincide with these settings.
... Read More!

Don't forget to visit my photography web site where we sell museum quality black and white prints framed to last up to 175 years - Outdoor Images Fine Art.
Wednesday, June 25, 2008

Summer Camp

Summer time calls and so do my two boys - eight and ten! I have been on staff at summer camp this week and trying to keep up with my day job, so my posts have slowed, but only for another week or so.

I am also working on two large projects which I will keep you updated on here.

First, you have seen the many recent posts on Lightroom Galleries LRG Complete Web Gallery for Adobe Photoshop. I have been trying to keep up with Joe as he programms this spectacular web gallery. I am making modifications to the User's Guide with each of his new releases. For those of you that haven't tried it, LRG Complete is a unique web gallery and very complete. See the side links to download.

As part of this work I am also writing two books. One is an advanced user's guide for LRG Complete. With so many variations available to present your work using LRG Complete, I wanted to create a guide that will enable you to get the absolute maximum out of the web gallery. Also, with the User's Guide approaching the 5 megabyte size, I wanted to keep it within downloadable parameters. Keep watching as this will be released with the first final version of LRG Complete.

The other book will be a surprise. I am working with several publishers to obtain some interest. I will post information here as soon as it makes sense to do so.

Thanks for visiting and I hope your summer is going well!
... Read More!

Don't forget to visit my photography web site where we sell museum quality black and white prints framed to last up to 175 years - Outdoor Images Fine Art.
Friday, June 13, 2008

Version RC2.5.5 of LRG Complete Released

Joe of Lightroom Galleries has released another candidate for LRG Complete, the PayPal, Google Checkout Web Gallery for Adobe Lightroom.

This release has some support for international characters as well as superb tie in to the shipping functions within PayPal and Google Checkout. Not to leave anyone out, Joe has also allowed and Email Order system for those that don't use either of the web based systems.

Check it out here: LRG Complete RC2.5.5. ... Read More!

Don't forget to visit my photography web site where we sell museum quality black and white prints framed to last up to 175 years - Outdoor Images Fine Art.
Lightroom 2: Cropping and Pixel Size

Cropping while maintaining a specific pixel size has been a continued hot topic on the Lightroom 2.0 Beta forums. After some exploration based on a post from Jao van de Lagemaat on the Lightroom Forum for the 2.0 Beta version, I found a way to show the pixel sizes directly on the screen while cropping. Here is an article to show you how to get that pixel size on your development module window setup.
http://www.blogger.com/img/gl.photo.gif
Add Image
First, bring an image up in the development module window. Then go to the View and View Options menu. See the example below:


After clicking on this menu item, you will get the following dialog:


Be sure to check the Show Info Overlay box at the top of the dialog. Otherwise, your changes will not show up. Second, go to the Image Info 2 section and change the bottom two items. Use the drop down box and select Cropped Dimensions and Megapixels.

There is no OK button, so just close the window.

Presto! You now see the size of the image in pixels and the combined size in Megapixels. Furthermore, when you crop an image, you can see the resulting crop in pixels without having to switch back to the Library module. See the example of an image crop in the Development window below:


While this isn't a fix for those that want to input an image density setting for cropping, it will allow you to get reasonably close with a little math, all on one screen.

Enjoy!

... Read More!

Don't forget to visit my photography web site where we sell museum quality black and white prints framed to last up to 175 years - Outdoor Images Fine Art.
DPI and PPI: Which is What?

I come across questions and forums where people use DPI and PPI interchangably. Unfortunately, I am also guilty. I have found what I thought was a great explanation of the difference. I have copied the article here and provided a link to the original.

DPI and PPI Explained

There seems to be a great deal of confusion among many people regarding the use of some terms in digital imaging. The main problem with this is that DPI (dots per inch) is an old term that has been applied to everything relating to resolution and the size of a digital image. This is very confusing because different situations work with resolution in very different ways, and having a single term for all of them just makes things more confusing. More recently, the term PPI (pixels per inch) has appeared in common usage and is far more specific for what the term entails. DPI is still used in some documents and software when PPI is really what they mean, but this is changing. This article is an attempt to explain what the 2 terms mean and how they should be used.

As usual, this article originally saw light in a Usenet group. In this case, rec.photo.digital. The article is a combination of 2 seperate posts I made regarding the difference between DPI and PPI, with some additional editing.

PPI

Okay, let's start with PPI, it's easy to understand. This is the number of pixels per inch in your image. This will affect the print size of your photo and will affect the quality of the output. The way that it will affect the quality of the output is that if there are too few pixels per inch, then the pixels will be very large and you will get a very pixelated image (jagged edges, you will actually see individual pixels, not good). You'll hear various different numbers thrown around as to what an acceptable PPI for a print-out is. A lot of this will depend on the size of the print. This is because you look at large prints from a further distance than a small print, so you can get away with a lower PPI and still have the image look fine.

Anyways, all that PPI does is affect the print size of the image. There are 2 ways that you can change the print size, by resampling or by not resampling. Not resampling is what you normally want to do, this will only change the size of the print out. Using resampling will actually change the number of pixels (and thus the file size) in order to match the print size. So for instance, if you don't resample, changing the PPI setting will increase or decrease the print size (it will increase if you drop the PPI, it will decrease if you increase the PPI). With resampling, if you change the PPI, you will loose pixels (if you set the PPI to a lower value) or you will have pixels created (if you increase the PPI). Creating pixels is a bad idea, they get generated by the computer and the results aren't usually that good. Throwing away pixels is fine as long as you won't need the bigger size later (that's why it's usually a good idea to save the original large file).
An Example

Suppose you have a 100 x 100 pixel image could be printed at many different sizes. If you set the image to print at 10 PPI, then you'd have a 10" x 10" image. If you set the image to print at 100 PPI, you'd have a 1" x 1" image. Note that adjusting this value doesn't effect the number of pixels in the image at all, it just changes how big the print will be.

Take our 100 x 100 pixel image again. Suppose it's set at 100 PPI (producing the same 1" x 1" printed image). With re-sampling off, when you adjust the PPI the dimensions adjust as well, this is how things worked in the example above. With re-sampling on, the dimensions won't change. So, if you changed the PPI to 10 with re-sampling on, you would still keep a 1" x 1" image and the computer would throw out pixels to make the image stay that size. So in this case, you'd end up with a 10 x 10 pixel image in the end. If you went the other way, and changed the PPI to 300, then the computer would generate pixels to make a 300 x 300 pixel image that's still 1" x 1" when printed.

Usually, the only reason you want to use re-sampling is for reducing the size of your image. For example, my scanner produces 3888 x 2592 images. These images are too big to use online (both for display and because of filesize). By using re-sampling, I can adjust the size of the images to something more appropriate for online use.

DPI

Now let's talk about DPI. DPI only refers to the printer. Every pixel output is made up of different coloured inks (usually 4 or 6 colours, depending on your printer). Because of the small number of colours, the printer needs to be able to mix these inks to make up all the colours of the image. So each pixel of the image is created by a series of tiny dots (you could think of them as sub-pixels). Generally, the higher the DPI, the better the tonality of the image, colours should look better and blends between colours should be smoother. You'll also use more ink and the print job will be slower. You might want to try setting your printer to a lower DPI to save ink and speed up the job, see if you notice any difference in quality. The lowest setting where you don't see any loss in quality should be the best one to use.

So a 1200 dpi printer uses 1200 dots of ink in every inch to make up the colours. If you were printing a 300 PPI image, then every pixel would be made up of 16 smaller ink dots (1200 DPI x 1200 DPI / 300 PPI x 300 PPI). A lower DPI would have fewer ink dots making up each pixel, which would make the colour look worse. A higher DPI would have more ink dots for each pixel and should give more accurate colour (especially under close examination).

Copyright

frugal@tildefrugal.net
Copyright © Andrew Dacey

See the full article here at: http://www.tildefrugal.net/photo/dpi.php ... Read More!

Don't forget to visit my photography web site where we sell museum quality black and white prints framed to last up to 175 years - Outdoor Images Fine Art.

Wednesday, June 11, 2008

SEO Guidelines

You ask, we are photographers, what does SEO have to do with us? My answer is simple: If you want anyone to find your photography, which is assumedly why you posted it on the web, then SEO is important to you. If you don't know, SEO stands for Search Engine Optimization and has long been the challenge of web developers to find an easy way for the creation of web site that everyone will see.

I stumbled across an article on 10 SEO Rules for Designers. There are many good ideas for us photographers as we create our own sites.

I hope this helps you get noticed on the web! ... Read More!

Don't forget to visit my photography web site where we sell museum quality black and white prints framed to last up to 175 years - Outdoor Images Fine Art.

New Lightroom Exchange on Adobe!

Sean McCormack posted an article on Lightroom News about a new Adobe exchange area for Lightroom. We have long awaited such a site where developers can post Develop Presets, Export Plugins and Web Galleries to share with the Lightroom Community.

This is a must visit site and be sure to bookmark it and visit back often as I am sure it will take hold over time. Adobe Photoshop and the other creative products by Adobe have had such exchange sites. They have been sucessful and there is no reason not to believe this one won't be sucessful as well.

Enjoy! ... Read More!

Don't forget to visit my photography web site where we sell museum quality black and white prints framed to last up to 175 years - Outdoor Images Fine Art.

Thursday, June 5, 2008

Lightroom Galleries LRG Complete User's Guide for RC2.5.4

The user's guide for Lightroom Galleries LRG Complete RC2.5.4 is now released. You can download it from the side bar here.

Please note that we are releasing the User's Guide at least as often as new release candidates come out. The frequency is high to keep up with the enormous number of changes that Joe at Lightroom Galleries has been pumping out. Thank you, Joe!

We have also included a What's New section in the introduction of the User's Guide so that you can see some of the major changes in the User's Guide. The version information for LRG Complete is near the end of the Guide.

Thanks for continuing to support my blog and keep checking back for new information on this great new Web Gallery.
... Read More!

Don't forget to visit my photography web site where we sell museum quality black and white prints framed to last up to 175 years - Outdoor Images Fine Art.

Lightroom Tip#16 - Ordering Images in Lightroom Web Galleries

Often the order we would like to showcase our images is not the same order we shot the images with our camera. However, we frequently view our images in the Library in this order. How then, can we re-arrange our images to show up in a custom order when making a Slideshow or Web Gallery page? Here we show you how.

The key is setting the sort in the Library Module while you have the images showing that you wish to set as a custom sort. See the example below where we set the sort order to a user defined type.


After setting this sort order, use the mouse to drag images around on the screen. Notice after moving an image, the numbering of the images resets (if you have the numbering visible in your images).

That's all there is to it! After re-sorting your images, proceed to make a Slideshow or Web Gallery and the new order will be preserved.

Note if the sort order is set to something else, like capture time, re-ordering your images will have no effect as Lightroom will send them back to capture time order before exporting a Slideshow or Web Gallery.

UPDATE FOR LIGHTROOM 2 BETA


Lightroom 2.0 Beta does not allow for custom sorting as Lightroom 1.4.1 does. The menu items don't exist. Because we are in the Beta stage, it doesn't mean the functionality will not be available in version 2.0 when released. However, we need to find a work-around in case it remains as it is in the Beta.

Kelvin Brown found such a work-around and posted an answer to my question in the forum. Kelvin found that you can create a collection of images and sort them in any order you wish by dragging and dropping the images to new locations. I confirmed that this works. After further testing, I also found that the custom sorting does NOT work in Quick Collections. Apparently this feature is only available in standard collections.

Although, better some than none!
... Read More!

Don't forget to visit my photography web site where we sell museum quality black and white prints framed to last up to 175 years - Outdoor Images Fine Art.

Wednesday, June 4, 2008

Web Galleries and Templates - Confusing Terms

Adobe Lightroom has specific terms when it comes to web galleries, templates, saved settings and presets. When you use a word processor, you refer to a template as a base for filling in the blanks and creating a new document. In Lightroom, this type of template is referred to as a WEB GALLERY. Also, in many software realms, you refer to a collection of stored items that get applied to a template as presets. In Lightroom, these presets are called TEMPLATES.

While this can be confusing to the beginner, this Lightroom convention is used throughout the community. I am in the process of reviewing my articles here to be sure I use that convention - Please bear with me while I make the change! ... Read More!

Don't forget to visit my photography web site where we sell museum quality black and white prints framed to last up to 175 years - Outdoor Images Fine Art.

Tuesday, June 3, 2008

Selecting Images with Multiple Keywords in LR 2

Adobe Lightroom 2 Beta has changed significantly the way we filter the catalog or library of images to find what we're looking for. In the process, the method of selecting images with multiple keywords has changed. Here I will show you two methods to get this done in Lightroom 2 Beta.

First, here are the assumptions in the Library:

1. There are four images with the keyword: farm
2. There is one image with the keyword: old farm
3. There are other images with neither keyword.

So the goal is to have the library only show images with the key words: farm and old farm.

Here's how we do it.

Using the Text Filter

First open the filter at the top of the library and click on the Text type. This is as opposed to Refine and Metadata. For the Text Type, choose Keywords and then choose Contains All. In the search box type 'farm' or whatever you are searching for. See the image below and you will notice that five images are shown - four with the keyword 'farm' and one with the keyword 'old farm'.


Note that if you are searching images containing multiple keywords that are different then separate them with spaces like the following:


If you are searching for images containing either of multiple keywords, change the type from Contains All to Contains like the following:


The Contains All and Contains logical types help control the use of the filter words. There are other filter types that can be used as well.

Using the Metadata Keyword Approach

Using the same filter in the Library as we did above, change the filter type to Metadata. Then in the left-hand column, choose the data type Keyword. When it opens, the 'All Keywords' item at the top will be highlighted. Go down and select two keywords by clicking on one with the mouse and another by holding the control (CTRL) key down and clicking with the mouse. See the example results below that match the same images using the Text filter previously:


Note that you can use the shift (SHFT) key and select a whole range of keywords consecutively, but I doubt that this would be used very often.

Conclusion

There are significantly more options available to search and filter a library. When thousands of images are included, this feature is very welcomed. The interface has changed significantly, but once you are used to the changes, is much more effective than in Lightroom 1.x. ... Read More!

Don't forget to visit my photography web site where we sell museum quality black and white prints framed to last up to 175 years - Outdoor Images Fine Art.