Saturday, May 31, 2008

New LRG Complete User's Guide - Smaller Download Size

I have update the User's Guide to LRG Complete by Lightroom Galleries and reduced the filesize by 40% to make download times less.

You can download the Updated User's Guide Here from my ftp site. Keep watching Lightroom Galleries as the Release Candidates are still coming with great improvements. The forum for LRG Complete is found here.

... Read More!

Don't forget to visit my photography web site where we sell museum quality black and white prints framed to last up to 175 years - Outdoor Images Fine Art.

Friday, May 30, 2008

Lightroom Tip#15 - Web Gallery Templates No Longer Work

Isn't it great that many developers on the web are constantly refining their web galleries and releasing new versions? One of the problems that creates is Web Templates for the Web Galleries that no longer work. If you try and load a template and get the following error, then follow these easy steps to re-connect your saved template to the new Web Gallery.


The solution involves two steps:

  1. editing the new web gallery to see what the name of the new version is
  2. editing your template to put that new name in.

Do the following:

1) Find the new web gallery, located where you installed it. Open the galleryMaker.xml file in a text editor and look for the following line near the top:

'com.adobe.wpg.Developer.WebGalleryVersion2.1'

The name of the Web Gallery is contained between the 'identifier' tages.

If your Web Gallery does not have this file, look for the galleryInfo.lrweb file and open it with a text editor looking for the following line near the top:

'id = "com.adobe.wpg.Developer.WebGalleryVersion2.1",'

The name of the Web Gallery is contained between the quotes.

Copy the name of the Web Gallery.

2) Go to the same root directory that your Web Galleries directory is located, find the Web Templates directory and the subdirectory your templates are stored in. This subdirectory is the same as your groups within Lightroom. The file might be something like this:

myWebPage.lrtemplate

Open the file in a text editor and find the following line near the top:

templateId = "com.adobe.wpg.Developer.WebGalleryVersion1.0",

This Web Gallery name should be the same as the one listed in the error dialog above.

Replace the name of the Web Gallery contained between the quotes with the new Web Gallery name you copied in step 1.

Save the file and restart Lightroom.

That's it! Your template should now load using the new Web Gallery. If the new Web Gallery has so many changes that your old templates cause it to fail loading (I have never had this happen), then it is probably easier to start over anyway. You can still open your template file and copy down any of the colors you used so that you can choose them again.
... Read More!

Don't forget to visit my photography web site where we sell museum quality black and white prints framed to last up to 175 years - Outdoor Images Fine Art.

Thursday, May 29, 2008

Lightroom Tip#14 - Really Quick Pick and Reject

How many times have you finished a shoot, uploaded your many images and then sighed because you knew it was time to go through and pick the images to keep and the ones to reject. Let's get on with it already! I want to start using my images, fix them up and get them published in a gallery!

Michael Clark posted this tip a few days ago and it is steller in the arena of picking and rejecting your images.

Using the CAPS LOCK key in conjunction with the P and X keys to pick and reject photos will automatically take you to the next image in the group. This can be accomplished by holding the SHIFT key, but that requires two hands to operate. Using the CAPS LOCK key brings us back to using one hand.

Thanks Michael for the tip! ... Read More!

Don't forget to visit my photography web site where we sell museum quality black and white prints framed to last up to 175 years - Outdoor Images Fine Art.

Wednesday, May 28, 2008

LRG Complete RC2.5 User's Guide

The user's guide for Lightroom Galleries newest E-Commerce web templates is available for download. Download the template package from the site as well. See the Lightroom Galleries web site for more information on this spectacular and professionally featured Lightoom template.

The full article for the user's guide can be viewed here.

Some people have told me that they are having trouble with the link above, which connects directly to the file. If you are having trouble, then try this link from my ftp site or see this article on Lightroom Galleries blog. You can download the documentation from that post as well. ... Read More!

Don't forget to visit my photography web site where we sell museum quality black and white prints framed to last up to 175 years - Outdoor Images Fine Art.

Lightroom Galleries Continues with RC2.5

Joe has been hard at work and burning the midnight oil to provide yet another great release of LRG Complete. As of this morning the template was updated for a few bugs so see the LRG Complete RC2.5 Download on his site.

The functionality is superb and the look and feel can be customized so that not all sites look the same, but unique. Joe says another round or so for release candidates before the final version, but this RC2.5 is very stable and you should be able to begin building a site.

Please be sure to support Joe's work with a donation if you use the LRG Complete templates - it will continue to help in development! ... Read More!

Don't forget to visit my photography web site where we sell museum quality black and white prints framed to last up to 175 years - Outdoor Images Fine Art.

Saturday, May 24, 2008

Lightroom Tip#13 - Backing Up Lightroom Templates

I wrote a workflow article on backing up Lightroom templates and I felt it was so important, I wanted to create a tip here as well. Do not forget to make this most important backup. See the full article here: Backing Up Lightroom. ... Read More!

Don't forget to visit my photography web site where we sell museum quality black and white prints framed to last up to 175 years - Outdoor Images Fine Art.

Backing Up Your Lightroom Templates

Adobe has created such wonderful efficiencies in templates that it is almost a crime not to use them. Considering the amount of time in creating and perfecting them, especially when it comes to Printing templates, backing up the templates is not only a MUST, it is the top item on your regular daily routine before morning coffee and breakfast. Failing to backup your Lightroom templates will only cause enormous pain one day when they are corrupt or deleted. The only item more important would be backing up images and catalogs.

To backup your Lightroom templates, find your template directory and copy the contents to another hard drive or a usb drive. Using the same location you backup your catalog and images is a good idea as well.

The template directories are typically found as listed below:

Windows XP
C:\Documents and Settings\username\Application Data\Adobe\Lightroom\

Windows Vista
C:\Users\username\AppData\Roaming\Adobe\Lightroom\

Macintosh
Users/username/Library/Application Support/Adobe/Lightroom/


NOTE: In Windows XP, the Application Data directory is usually hidden. You must enable “show hidden folders” in the folder options of the windows explorer before you can browse to that directory.

Backing up this entire base directory will get all of your Develop templates, Custom Text templates, Printing templates and all the other templates you have created. It will also backup your Web Galleries that you have downloaded and installed and the Web Gallery templates you have created to give your web site it's look and feel.

This is extremely important, do not forget to do it regularly!
... Read More!

Don't forget to visit my photography web site where we sell museum quality black and white prints framed to last up to 175 years - Outdoor Images Fine Art.

Thursday, May 22, 2008

Lightroom Presets Available - Black & White Filters

I specialize in black and white photography and the corresponding workflow in Adobe Lightroom and other products. However, color digital photography may eventually takeover film, so I have created a set of Lightroom Development Presets that emulate existing popular black and white filters.

You can download the presets in this post. I also explain how we created them.First, you can dowload the Black & White Filter Develop Presets here. If you'd like to see the basis for them, read on.

Chris Brandon, a member of the Lightroom Forums, created a post on Lightroom Spectral Values. He estimated the wavelength of each of the color sliders in the Lightroom Development module. Here is the list he came up with.

Red - 700
Orange - 590
Yellow - 578
Green - 560
Aqua - 500
Blue - 480

While we will not go into the physics of light for this post and while these are estimates, we use this information to help us determine what sliders to change and by how much to create a preset the is similar to a black and white filter.

Molecular Expressions wrote an article on Koak Wratten Filters for Black & White Photomicrography. It turns out that these filters use the same numbers and have the same wavelength transmissions whether it is for photomicrography or traditional photography. Light characteristics and film characteristics remain the same.

We used the information in their article, coupled with Chris' work to create the presets you can download above. We made some assumptions to help us estimate the amount of slider to adjust for light transmission.

We assumed that the peak wavelength transmission for a filter was around +75 on the slider. We further assumed that the transmission of a filter was a curve, albeit a steep curve and used values around +20 to +40 at the edges of the transmission range. Finally, we took wavelengths that were furthest from the transmission range and reduced the amount of development in the -20 to -40 range. For some filters, most notably the 'Deep' color filters, we used reductions in light transmission as high as -70.

While this isn't scientifically accurate, it is certainly aesthetically accurate. We tested the filters on a variety of color images and the ranges and changes appear to be inline with our black and white film experience.

Just as some filters are very strong in contrast and light transmission which produces an undesirable negative, there will be some of the stronger filters which are not meant for most Lightroom situations. However, we included them to be complete.

I hope you enjoy these presets!
... Read More!

Don't forget to visit my photography web site where we sell museum quality black and white prints framed to last up to 175 years - Outdoor Images Fine Art.

Tuesday, May 20, 2008

Lightroom Galleries Releases LRG Complete RC2 with Google Checkout

Lightroom Galleries has been busy working on the LRG Complete Web Templates for Adobe Lightroom. Release Candidate 2 is now out with some new features including Google Checkout in addition to PayPal and many site usability improvements.

The template can be downloaded at LRG Complete RC2 Released, and the forum has an area dedicated to this release that can be found here.

Be sure to check this out! ... Read More!

Don't forget to visit my photography web site where we sell museum quality black and white prints framed to last up to 175 years - Outdoor Images Fine Art.

Monday, May 19, 2008

Web Workflow

This Web Workflow involves creating a web page to publish or distribute on CD. Similar to the Slideshow Workflow, this workflow is Lightroom specific. This workflow discusses various methods to use Lightroom Web Templates to maintain web pages and web sites. For very specific template information, we will refer you to additional resources.


  1. Creating and Maintaining Web Galleries

... Read More!

Don't forget to visit my photography web site where we sell museum quality black and white prints framed to last up to 175 years - Outdoor Images Fine Art.

Managing Lightroom Galleries on the Web

This is part of my Web Workflow using Adobe Lightroom.

Adobe Lightroom is such an efficient tool, I developed a method for managing the web sites I create so that updates are available with minimum fuss and little manual work. The hard part is creating the first page or gallery. After that, maintenance is easy!

Using Collections in the Library Module and Templates in the Web Module are the keys to managing your web sites through Lightroom. We will discuss the creation of a gallery and then the maintenance plan showing each step along the way.

Creating the Collection For the Gallery

By now you have probably already created a gallery and tested it so that you have something to look at. Bear with me and follow these steps to create a new gallery so that it will be easy to update.

First, use the Library Module and select a group of images that should be shown in a single gallery for your web site. Use the SHIFT key to select multiple images in a row and the CRTL key to select images that are not immediately next to each other. With these images selected, go to the left panel and expand the Collections Pane. Be sure not to click on any of the collections.

As an alternative method, and one I prefer, clear the Quick Collection by pressing and holding the SHIFT and ALT keys and then pressing the B key. Then, click on each photo to add to the gallery and press the B key. Do this for each individual or group selection of images. You can find photos, scroll around and not worry about de-selecting some of the images. When you are done, click on the Quick Collection under the Library Panel and select all the photos before proceeding to the next step. This time you can click the first photo and SHIFT click the last photo or use the Edit, Select All menu item (CTRL-A is the shortcut for that menu item).


You can either click on the plus sign contained in the Collections Panel header, or


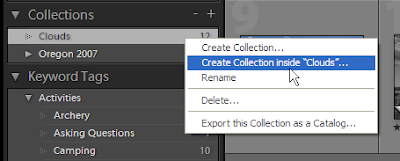
right-click on any of the existing collections and choose either a) create collection or b) create collection in xxxx. The first item will create a new collection at the base level and the second menu item will create a collection contained within an existing folder. When you choose one of these options, or press the plus sign as shown above, you get the following dialog box:


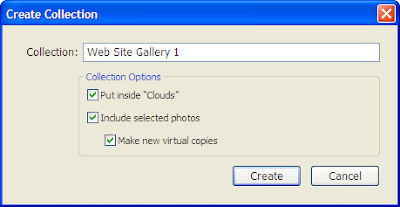
Note that there are three check box choices after inputting a collection name. They are:
  1. put inside xxxx
  2. include selected photos
  3. make new virtual copies

Check the first item to include it under the already highlighted folder or the folder you right-clicked on. Check the second item to include the photos we selected in the first step. Check the final item to make virtual copies of the images before adding them to the collection.

My preference is to use virtual copies in a collection so that I can change the development look, the cropping, the description and any of the other meta data for the purposes of the gallery. Also, virtual copies take up very little room on the hard drive.

Using this method you can organize your collections under folders. For example, you can create a "collection" titled, 'My Web Site.' To do this, open the Create Collection dialog box and de-select the checkbox to include the selected images. This will create a collection with no images in it which is the same as a folder. Then, right-click on the newly created collection, 'My Web Site' in this example, and create a collection underneath it. For example, create the collection, 'My First Gallery.'

Setting Up the Web Web Gallery

After creating the collection of images, go to the Web Panel and select a web gallery to create a web page with. Change all the settings and colors until achieving the look for this gallery. The images should be previewed on the screen.


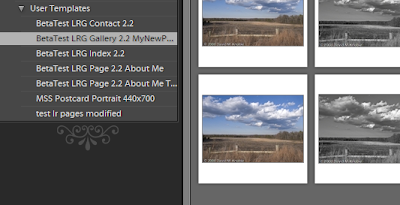
If you haven't created a template shortcut under the Template Browser Panel then go ahead and do so. This is done by clicking the ADD button at the bottom of the left hand pane or by right-clicking in the Template Browser Panel just like we did working with Collections. For example, you could name this one 'My First Web Gallery.'

After adding the new Web Template and storing the settings, perform the upload to your web site.

Now you have a published Web Gallery that can be viewed and used. So what do we do when we want to change the images?

Maintaining the Web Gallery

To maintain the Gallery we only need to perform the following steps:
  1. Select additional images
  2. Add them to the Collection
  3. Remove any images desired from the Collection
  4. Call up the Web Template saved
  5. Upload the changes

So, first go to the Library Module and select the collection we used to create the web gallery. In our example, we called it 'My Web Site'. Review the images to see what might need added. Then find those images in the Library and drag the image to the collection on the Collections Panel. If there are many images, you can use the Quick Collection as shown above. Just add the new images and drag them all to the 'My Web Site' collection.

Now review the total collection again and remove any of the images you no longer want in the gallery. There are two ways to accomplish this. First, you can right-click on an image in the Collection and choose the 'Remove from collection' menu item as shown here. If you added virtual images to the collection as I prefer to do, then you can delete the image because it is not an original image and it shouldn't be used anywhere else. This is done by clicking on the image and hitting the DEL key.

Once this is done, move to the Web Module and click on the Template Browser panel. Click on the template saved for the web gallery. In our example this was 'My First Web Gallery.' All of the preset choices should be loaded.

If you make any changes to the layout or colors, be sure to save them with the template. Do this by right-clicking on the template name and choosing the update menu item shown below.


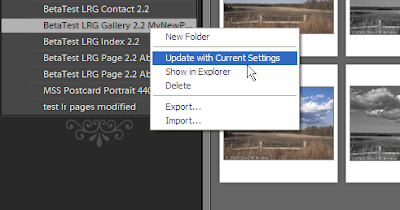
This saves all the current settings and updates the template for the next time.

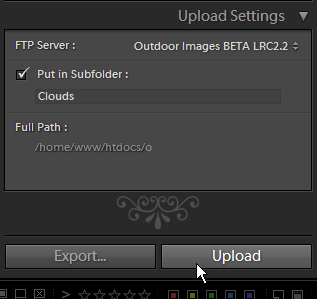
Before uploading the site, check the FTP settings. If you created presets for the FTP Uploads then select that item. I prefer to create an FTP preset for each base web directory and each gallery subdirectory. This prevents me from having to remember each and every individual web directory.


After uploading your site, view it in your internet browser to see the changes.

Conclusion

This is all it takes! Carefully setting up the collections and web gallery templates the first time makes maintenance a breeze. Even if you totally switch out the portfolio for different images, all the settings are there ready to go. Quick Collections are a must for anything more than a few pictures to add or create a collection with.

NOTES

If your web site has various subdirectories that get regularly updated, consider creating additional FTP presets. For example, if all your photo galleries are in a sub directory called 'photos' then create a second FTP Preset called 'My Web Site Photos' and set the directory to 'ftp://www.mydomain.com/photos'. This will allow you to easily add content without having to remember the subdirectory.
... Read More!

Don't forget to visit my photography web site where we sell museum quality black and white prints framed to last up to 175 years - Outdoor Images Fine Art.

Friday, May 16, 2008

New Logo, Same Site!

I changed my logo today to something I keep using in Lightroom. Nothing else has changed, we still work on digital and film photography workflows with Adobe Lightroom and other tools. We also still review new tools and discuss various other photograhy related subjects. Thanks for visiting and keeping up with what we are working on! ... Read More!

Don't forget to visit my photography web site where we sell museum quality black and white prints framed to last up to 175 years - Outdoor Images Fine Art.

LRG Complete Release Candidate 1 is Ready

Joe at Lightroom Galleries has provided a Release Candidate 1 for download of his LRG Complete web site templates for Adobe Lightroom. There has been a large amount of feedback and Joe is very responsive. The result is shaping up to be a very strong Lightroom template for the show and sale of photography.


RC1 now includes a fully functional contact page. Although it's up to the user to setup the email functionality on their site server, the contact form is necessary for any site that sells something. The paypal integration is improving.

One of the best features of any of the templates I have created or seen is the quick upload times. Joe has optimized the templates to perform individual functions and as a result, the upload times are extremely quick. Joe also setup the base of the web site as a flash presentation and the results are much better than plain ole' HTML. Finally, the menu and styling is basically set at the site level so that the infinite number of galleries and extra pages that can be added all carry the same header.

Some improvements I'd still like to see include a customizable footer with links, a customizable font to use site wide, and some choices to move the menu and gallery bar on the left or right side of the site. I'd also like to see a custom html title that is different from the site name. Finally, I'd like to see an image available to show on the contact page (after all, it's a photography site!). There are also a few improvements that can be made in order to add pages to the site.

All in all, this template is going to be a leader in the Adobe Lightroom arena. Keep watching here as we will be releasing more news and some help aids towards getting started and a sample site to view.
... Read More!

Don't forget to visit my photography web site where we sell museum quality black and white prints framed to last up to 175 years - Outdoor Images Fine Art.

Tuesday, May 13, 2008

Scanning Negatives - Hardware Considerations - Part II

In our Part I Post on Scanning Negatives - Hardware Considerations we discussed the properties of light, film and glass (lenses) in making the perfect photograph. We then showed that these same properties are used to scan the negatives or slides when turning them into digital images.

Here we discuss the aspects of light, glass and CCD's in negative and slide scanners. We also compare this to a Nikon Coolscan 5000 ED to see if it fits the bill to create the perfect digital image.

Light

We have the perfect negative so what light do we send through it to make a digital image. CCD's are especially senstive to Red, Green and Blue light, hence the RGB designation in computer lingo. In order to scan a color image, slide or negative, the scanner should produce a red image, green image and blue image of the negative or slide. These three images can be combined as if they were created from a digital camera.

Dust and Scratches

Realistically, even a perfect negative or slide will contain dust and/or scratches. Digital images from CCD's in a digital camera are better protected although the newer cameras have modes to remove dust from the sensors. So how do we limit the scanning problems with scratches and dust on a negative or slide?

The answer is infared. Infared light can highlight scratches and dust. By creating a fourth layer used as a mask, signficant amounts of scratches and dust can be electronically removed from a scanned image.

Glass

The glass that the red, green, blue and infared light pass through to get to the CCD and result in a digital image, must be special photographic glass. In fact, the scanner should use the highest quality glass used in camera lenses. After all, focusing on a negative to create an image is nothing more than taking a phtograph of a photograph.

There are a variety of mineral glasses and low dispersion glasses available to create a proper scanning lens.

Film - CCD Sensor

The CCD sensor is the film for the scanner. The size of the CCD chip and the density of the pixels determine the quality of the resulting image. Larger size and higher density is similar to low speed film and should result in a higher quality image.

Because computer chips have occasional power spikes and other electronic interference, a simple one pass scan is insufficient for a perfect image. Using a single scan will produce errors in the scan with zero chance of help removing the imperfections. I.e., a second scan of the image will help the processor determine if any pixels are not properly rendered from the first scan.

Density of the scan is determined by dpi or dots per inch. The more dots that get scanned in a single inch of negative or slide, the more detail from the film will show through. In some cases, a scanner could even scan the grain of the film if it were dense enough in the CCD.

A film scanner should have the ability to scan negatives with a final optical output somewhere in the 3,500 dpi to 4,000 dpi and above.

Finally, what level of colors and/or gray need to be recoded? How many colors should be kept? The same problem occurs in photography prints. Photographic paper has a smaller range to record black and white images than the film contains.

Nikon Coolscan 5000 ED

How does the Nikon Coolscan 5000 ED scanner stack up against our requirements? First, the case is very sturdy, well put together and protective of the computer inards.

Let's discuss the Light component: This Nikon scanner uses all three R,G and B lights by using LED's and contains a fourth - the infared LED to help with scratch and dust removal. The LED lights use less power and also last longer and cost less.

The glass used in a Nikon Coolscan 5000 ED is the same extra-low dispersion glass found in Nikkor lenses. This limits the abberations that could be found in the resulting digital image.

The CCD is also strong in the Nikon Coolscan containing two lines to scan at a time and scans using optical resolutions of up to 4000 dpi. The scanner also contains a 16 bit converter so that the scanned images contain 16 bit color.

Conclusion

There are many other feature in the Nikon Coolscan that make it appealing, like the built in Digital ICE, USB 2.0, slide feeders, negative feeders, TIFF formats in greyscale and color and more. However, all those features aside, the physics behind the Nikon Coolscan make it a worthwhile investment to capture negatives and slides and turn them into digital images.

The Nikon Coolscan 5000 ED is my scanner of choice and we will provide some test results to see which settings are best to use when scanning media into digital images. ... Read More!

Don't forget to visit my photography web site where we sell museum quality black and white prints framed to last up to 175 years - Outdoor Images Fine Art.

Scanning Negatives - Hardware Considerations - Part I

Let's start with a little theory. I propose that the same considerations taken into account in creating a perfect photograph also need taken into account when determining a scanner to convert film to digital negatives. To prove this, let's start with a brief discussion on the photography.

A great photograph, aesthetics aside, is the result of the proper film being exposed to light through a high quality glass lens for a proper amount of time. Light, glass, film - all three make the perfect photo.

Light

Light is always perfect. There can be varying amounts of light and the light might not be covering the subject in the desired manner. However, the light is there nonetheless and correct measurements must be made of the light to provide a proper exposure.

Film

This light then hits the emulsion of some film and records the patterns creating a negative (or positive in the case of reversal film). Different films have different sensitivities to the light. This means some film records more detail (high speed film) in a given amount of light and some less detail (low speed film). Knowing what size the ultimate photograph will be printed in along side the subjec matter an anticipated available light, determine which film to use.

For small 4x6 prints, just about any speed film will provide a good print. For a 13x19 print or 24x48 print, a slower speed film is typically used. The slower the film, the more light needed to expose the image, but the less grain is also present.

Lenses and Glass

Leica engineers have long studied and perfected the art of removing abberations caused by light moving through glass. Erwin Puts has written volumes about lenses including a 2002 Compendium on Leica Lenses their Souls and their Secrets.

Light bends through glass and comes out the other side. In the course of bending various abberations show up: flares, comas, loss of contrast and other problems that impede the recording of an image on the film. Different physical types of glass in different configurations help adjust the bending of the light to come out the other side and expose the film where we want it to.

This means the best glass in the best configuration has the best chance of producing the perfect photograph.

Conclusion

Light through glass onto film produces the photograph. To take a negative or slide and create a digital image, we pass light through the film through glass in a scanner to an electronic CCD to record the result. Thus, Light, glass and film qualities must be taken into account a second time to take the perfect photograph and convert it to the perfect digital image.

See Part II of Scanning Negatives - Hardware Considerations for the discussion on scanner hardware that this applies to. ... Read More!

Don't forget to visit my photography web site where we sell museum quality black and white prints framed to last up to 175 years - Outdoor Images Fine Art.

DNG - Digital Negatives - Updated Specs

The DNG specifications have been updated. See this article in Lightroom Journal. ... Read More!

Don't forget to visit my photography web site where we sell museum quality black and white prints framed to last up to 175 years - Outdoor Images Fine Art.

Scanning Film Images to the Hard Drive

This is part of my Image Conversion Workflow.

This is the point in our workflow where we convert from film or slide to digital. For any photographers, myself included, that still enjoy the quality of a good negative and the absolute perfection of pressing a shutter and immediately getting the picture taken, this workflow will help you go from Negative to Digital. After conversion, the process is the same whether you start with a RAW file from a digital camera or a TIFF from your negative.

We will break down this Negative to Digital Workflow here.


  1. Develop film or negatives
  2. Determine file number for scanning
  3. Scanning the slides or negatives to the hard drive


There are many considerations when scanning negatives and slides. Here we discuss many of the important aspects to consider before beginning the process. We will discuss each item in detail and some of the settings we will experiment with various choices to ultimately determine which setting is the best to use.

  1. Hardware considerations
  2. GEM settings
  3. ICE settings
  4. ROC settings
  5. Sampling settings
  6. Bit deapth settings
  7. Unsharpening and sharpening settings
  8. Curve settings
  9. Other processing settings


As we continue to develop our workflow, we will also discuss applying efficiencies to our scanning workflow to automate as many settings as possible. ... Read More!

Don't forget to visit my photography web site where we sell museum quality black and white prints framed to last up to 175 years - Outdoor Images Fine Art.

Adding a Topic: Film to Digital Workflow

There are still many film photographers, myself included. Film continues to have an edge over digital in quality of image, especially as it relates to cost. More importantly, the response time of a film camera is instant whereas we still have some delays in digital cameras. Even as they decrease, film is not dead yet, so we are continuing our Digital Workflow by interjecting a section on converting our negatives and slides to the digital medium.

Here is the beginning of our framework. Stay tuned as we discuss not only procedure, but the various settings available and how they work. ... Read More!

Don't forget to visit my photography web site where we sell museum quality black and white prints framed to last up to 175 years - Outdoor Images Fine Art.

Thursday, May 8, 2008

Lightroom Tip#12-Turning Off Unused Panels

Because Adobe Lightroom works so well on laptops for field or trip work, keeping a tight reign on screen space is important. Even with larger laptop screens, the develop tools and other areas in Lightroom can take up a lot of space needed for image work. Here is a tip that will remove some of the clutter and make working in Lightroom easier and customizable for you.

Some of the many panels in Lightroom are not necessary for every user. Some may find the folders panel in the Library module not useful to them. Some may find the camera calibration panel in the Develop module is not necessary. Personally, I don't use either the camera calibration panel or the lens correction panel.

So why not hide those panels? Hidden panels do not take up more screen space and do not clutter the work area and cause a user to mover around in them needlessly.

To remove a panel from view, simply right-click on any panel name on the side that contains panels to hide. Then choose the name of the panel to hide. It should have a check mark beside it indicating it is in view. After clicking on the panel name, the check mark and the panel disappear. See the image to the right where the camera calibration and the lens correction panels are hidden in the Develop module.

To show the panel again, simply right-click again on any panel and select the panel to show. It will not contain a check if it is already hidden. After selecting it again the menu for that panel will be checked and the panel will be shown.

Notice that the menu also has collapse all and expand all menu items. This will expand or collapse all panels to use or store information.
... Read More!

Don't forget to visit my photography web site where we sell museum quality black and white prints framed to last up to 175 years - Outdoor Images Fine Art.

Lightroom Tip#11-LR2 Filtering in Smart Collections

Adobe Lightroom 2.0 Beta included a new feature called Smart Collections. These collections are created automatically after setting some rules. The rules are very customizable and can filter based on certain data from your images. There is a trick to filtering for some words though that are contained within other words. If not properly entered in the filter, the smart collection will contain images that were not intended to be included.

When setting up a rule to filter on a word that is short, not very unique and can be part of other words, there is trick to follow. Take the example of a keyword 'rob' which is also contained in 'robby', 'robert', 'throb' and 'robin'. Simply setting the smart collection to contain 'rob' will filter in a lot of other images that were not desired.

The trick (or rather rule) is this: use the '+' sign in your filter text. The '+' sign, or plus sign, indicates either starts with or ends with depending on whether you place it at the beginning of a word or the end.

Thus, to filter out 'throb' in our example, use '+rob' as the filter. This will leave 'rob', 'robby', robbert' and 'robin'. To filter out everything except 'rob', use the '+' sign at both the beginning and the end. Thus, '+rob+' will filter out 'robby', 'robbert' and 'robin' in addition to 'throb'. Reading the translation of the filter you get 'starts with rob and ends with rob'.

Hope this helps!
... Read More!

Don't forget to visit my photography web site where we sell museum quality black and white prints framed to last up to 175 years - Outdoor Images Fine Art.

LRG Releases Beta for Lightroom Paypal Site


Lightroom Galleries has released it's long awaited Lightroom Web Gallery template for creating a complete web site that includes purchasing prints through paypal! The name of the Lightroom template is: LRG Complete. The Complete stands for generating a complete web site. The template consists of three Lightroom Web Galleries that are fully customizable to your own color themes and taste. The three templates complement each other and work to create a fully functional web site for photography. If you don't have a paypal account or don't want to sell your work, you can still use this template to show your work.

Demo and Download

Visit the LRG Demo Site to see a live demo of the finished product. Visit the Beta Download Announcement to download the Beta version.

LRG has worked hard on this first release and has been known for the last release (LRG Complete 1.1) as developing a quality template. Remember this is a Beta version and is subject to bugs and improvements before a final version is released.

Stay Tuned!


Keep tuned here and we will continue to bring you news about this release. Thanks to Lightroom Galleries!

More Screenshots


... Read More!

Don't forget to visit my photography web site where we sell museum quality black and white prints framed to last up to 175 years - Outdoor Images Fine Art.

Wednesday, May 7, 2008

How To: Create a Keyword Hierarchy in Lightroom

Keywords are an extremely beneficial aspect of Adobe Lightroom and the larger the library, the larger the keyword list will be. Managing this list and keeping it efficient to use can be a challenge. Luckily, there are ways to organize and re-organize your hierarchy of keywords.

This article will not focus on the many ideas of which keywords to use, but will rather show you exactly how to create the hierarchy and modify it within Lightroom. See the article on methods of assigning keywords to see how to assign the keywords you create to individual or grouped images.

Lightroom can store multiple levels of keywords similar to the Folder panel above it in the Library Module. To create a hierarchy of keywords that you can group and drill down, plan it out on paper first. This will make creating the base keywords much easier. You can also create your keyword list in another program and import it. We will create another post on importing keywords in the future. First, let's create some in Lightroom directly. For this example, we will create the hierarchy Nature Location -> National Forests -> Pisgah.

Creating the Base Level

Creating the base level for a hierarchy involves inputting the base keywords. Simply click on the plus sign next to the Keyword Tags panel as shown below.


This will bring you to the Create Keyword Tag dialog box. Input one of your base keywords as shown in the image. Be sure to de-select the checkbox that allows you to include the selected images as attached to this keyword. If you are creating a base keyword, you will probably not have any images directly attached to that keyword. More on the results of the hierarchy later in this post.


You see we entered Nature Locations as the base keyword. After creating this base keyword, it is time to create our first sub keyword.

Creating Second and Subsequent Levels

We ultimately want our hierarchy to look like the image below. The base keyword is Nature Location and then we have sub-folders that show National Forests and then Pisgah.


To add a second or lower level keyword to the hierarchy, right click on the keyword to insert under. Then click on the menu item that says Create Keyword Tag inside xxxx. The same create keyword tag dialog will be shown. Enter the sub keyword and create it. It will be located underneath the base keyword. Continue in this manner to create the hierarchy you need.

Bottom Level Keywords

Notice that the Pisgah keyword in the image above has a bright gray triangle to the left of the keyword. This indicates that additional keywords are underneath Pisgah. I have further defined locations within Pisgah Forest as my bottom level keywords. These bottom level keywords have a grayed-out triangle next to them indicating no further keywords underneath them. These bottom level keywords will be the ones assigned to images.

Assigning Keywords

Now that we have a hierarchy of keywords that might be many levels deep in some cases, what keywords need assigned to an image? The answer is: Always the bottom level keyword!

Using our example, if you assign the keyword Pisgah to an image, then you can search for and find the image using all three keywords in the hierarchy: Nature Location, National Forests, Pisgah. (NOTE: I realize that I told you I had bottom level keywords under Pisgah, but for this example, we are using Pisgah as the bottom level keyword).

The keyword list is also useful. If you click on the Nature Location keyword, all images assigned to bottom level words under that hierarchy are selected. If you click on the National Forests keyword, only images that are assigned to bottom level keywords under National Forests are selected, and so-on.

Using bottom level keywords is important to a) keep your workflow as time efficient as possible - assigning one keyword instead of three in this example, and b) keep your meta database as trim as possible - for disk space, backup and speed considerations. Imagine having Nature Location assigned to 1,000 images that don't need it assigned in order to find the image!

Moving Keywords Around in the Hierarchy

Moving keywords around in the hierarchy is simple. Drag the keyword on top of the new word you wish to move it under. For example, if you have a base keyword as flowers and later want to move it under another keyword called plants, then drag the flowers keyword with the mouse until plants is highlighted. Letting go of the mouse will move the keyword. The assignment of the images to the flower keyword doesn't change, only the location in the hierarchy of the keyword itself. It really is that easy!

Now for the harder part. You can drag a sub-keyword and make it a base keyword by dragging your mouse all the way to the left of the list, outside the arrows. It will turn into a little sliver instead of highlighting a word. The keyword will be put at that level in the hierarchy. It works, but takes a little more dexterity.


Conclusion

Creating a hierarchy in Lightroom is easy to do and very important to efficiently organize and find your images. See the article on methods of assigning keywords to see how easy it is to drag and drop keywords for assignment or inputting them through forms and the keywording panel.
... Read More!

Don't forget to visit my photography web site where we sell museum quality black and white prints framed to last up to 175 years - Outdoor Images Fine Art.

Wish - Synonymns - Use 'em or Drop 'em

Lightroom 1.x has long had synonyms that can be entered as part of the keyword structure. However, synonyms, while they can be exported with images and libraries, cannot be used in searches. This holds true in Lightroom 2.0 beta.

Synonyms help keep the keyword list smaller. In fact, synonyms are a incredible idea for Lightroom to use. However, we need to be able to search on them. As the keyword list gets larger and larger with big libraries, and keywords are deeper in a hierarchy, it becomes all too easy to forget which keywords are used.

In that case, searching for a similar term can make all the difference in finding an image. Please, Adobe, add the ability to search on the synonyms - especially since we already have them input!
... Read More!

Don't forget to visit my photography web site where we sell museum quality black and white prints framed to last up to 175 years - Outdoor Images Fine Art.

Sunday, May 4, 2008

Lightroom Shortcuts #4 Quick Loupe View

When viewing images in the Grid View of the Library module in Adobe Lightroom, there is a shortcut to view the image in Loupe view and return to the Grid view when done. Sean McCormick wrote a blog on this shortcut and how to use it.

When you are in the Library Module and using the Grid View, there is a Navigator panel on the left column. This Navigator panel shows a preview of the image selected in the Grid view. Move the mouse over the picture and hold the left mouse button down.

As long as the mouse button is held down, the image is shown in the Loupe view. When the mouse button is released, the Loupe view is closed and the Grid view shown again.

This can be used for a quick look at a picture in a much larger size and is especially useful in the early sorting and rating stages.

See Sean's article here.
... Read More!

Don't forget to visit my photography web site where we sell museum quality black and white prints framed to last up to 175 years - Outdoor Images Fine Art.

TTG MonoSlideShow Template - Using AutoPlay Correctly

The Turning Gate continues to update and publish superb Adobe Lightroom web galleries. While there are several flash enabled components available for Lightroom, one that I use is MonoSlideShow. The Turning Gate has created a Lightroom web template to create a MonoSlideShow called TTG Monoslideshow Gallery.

Unfortunately, due to the way Lightroom and this template work together, creating an Autoplay MonoSlideShow is tricky. Here I show you several ways to create one.

If the Autoplay item is checked in this template and the slideshow is running an export or upload will hang. Lightroom will indicate it is checking the FTP connection and stop there forever.

There are three ways to sucessfully create an autoplay monoslideshow. One involves mannually editing the resulting monoslideshow.xml file, one involves using the controls and having them hide and the third involves a trick I discovered.

Editing the XML File


First, you the template can be setup with all the parameters customized. Review the slideshow by checking Autoplay in the Main Gallery Attributes under the Site Info panel. Once the slideshow works as desired, remove the check from the Autoplay checkbox. Then export or upload the template as desired. Finally, edit the file labeled monoslideshow.xml. In the first few tags is an tag labeled autoplay. Edit this tag as follows:

autoplay="true"

Save the file and run the template. Note that you may need to restart apache or IIS in order for the slideshow to update in a browser. This method works, but involves editing after the fact. I prefer a more automated solution which works perfectly after an upload to a web site.

Using the Control Auto Hide Feature


The second option is to set the Control Options under the Appearance Panel to autohide the controls after the slideshow starts. Set the slideshow to play using the control shown in the preview. Then select the checkbox enabling the control to auto hide. Export or Upload the template as normal. The slideshow will start with the controls showing which will soon disappear for the remainder of the slideshow.
This method works with no further editing, but if you don't want the annoying control panel to show and just want a slideshow to run, this solution may not work.

Bypassing the Error in Lightroom


Setup the slideshow to run correctly using the Auto Play checkbox. Leave the slideshow running and press the export or upload button. The export or upload will hang as shown below:

Then, remove the check from the Auto Play checkbox. Finally, press the small 'x' next to the hung process in Lightroom to cancel that process. It will begin cancelling and a second process will commence as shown below.

This second process is the export or upload and it will complete correctly. Check out the slideshow and it will automatically being playing.
... Read More!

Don't forget to visit my photography web site where we sell museum quality black and white prints framed to last up to 175 years - Outdoor Images Fine Art.

Thursday, May 1, 2008

Wish - Add Cropping to the Custom Develop Presets

Cropping is a very important part of image development and while Lightroom (both the 1.4.1 and beta 2.0 versions) allows for many variations in cropping, only five items can be saved as custom cropping sizes. For many photographers, this is not enough. Think of the simple home photographer that wants to print only 4x6, 5x7 and 8x10 prints. They would need six presets: 4x6, 6x4, 5x7, 7x5, 8x10, 10x8 in order to efficiently manage crops.

I have an idea that would make it easy to store as many cropping requirements as you would need. Let's use the custom preset creation.

Currently, Lightroom allows for a wide variety of develop module settings to be stored in a custom preset. Simply check the box and that setting is saved. Interestingly enough, cropping is not a choice.

Some schools would say that including cropping would defeat the universality of a development preset. That is true. However, there is no current way to store more than five preset cropping levels and, quite frankly, using a menu to store more than that would not be efficient.

The preset items, however, can be sorted and stored within folders making organization extremely easy. Consider the following workflow:

a) import an image.
b) apply a development preset to adjust contrast, colors, etc.
c) apply a cropping preset for say, 11x15
d) print the image to frame and hang
e) apply a cropping preset for say, 800x600
f) export the image as a 800x600px jpeg for the web
g) come back and apply a cropping preset for say, 8x10
h) print another copy of the image for a portfolio book to save.

All easy to do with a preset that only checks and saves the cropping. The other presets could be saved with everything but the cropping.

There may be another way to store infinite crop settings, but this was the one I could come up with. I hope we can add this functionality to Lightroom 2.0.
... Read More!

Don't forget to visit my photography web site where we sell museum quality black and white prints framed to last up to 175 years - Outdoor Images Fine Art.

Lightroom Tip#10-Cropping Images to Certain Pixel Sizes

I keep running across posts where someone wants to crop an image in Adobe Lightroom to a certain pixel size but doesn't know how to do it or believes it cannot be done within Lightroom. It can be done and you can crop an image to a certain pixel size. Here I will show you how to do it.

Keep in mind that if pixel size is important, then it should be for storing an image digitally. Printing an image to a certain pixel size is a more complex function that needs two variables: pixels in the image and the pixels per inch (or dots per inch) of the printing hardware. We will not be discussing printing images here, only exporting an image to a certain pixel size although this method can be applied to printing with a little more work and a calculator..

In order to export an image to a certain pixel size, use a combination of the cropping tool in the Develop module and the Exporting function under the File menu. First we will review the cropping necessary.

Cropping the Image for a Given Pixel Size


Select an image in the Library module to export to a certain pixel size. Then move to the Develop module and select the cropping tool. Select the aspect menu as shown above and click on the Enter Custom menu item.

You will get the dialog box shown at the left. Enter the crop size using the number of pixels to crop the image to. For example, to crop an image as 800px by 600px, enter 800 and 600 in the Custom Aspect Ratio. Note that this will not crop to a certain number of pixels, but it will crop to that aspect ratio. We will set the number of pixels later and using this aspect will avoid distortion or additional cropping of the image.


Next, crop the image using the aspect ratio just created. Either crop the image using the default frame size presented in the Lightroom workspace, or adjust the size smaller or larger. Adjusting the size of the crop will not alter our final image because we are setting the pixel size when we export. This step is only to set the correct relationship between height and width so that the final image output will be certain.

Exporting the File for a Given Pixel Size

After finishing the cropping, the last step is to export the file. Select the File menu from either the Development module or the Library, they are all the same File menu. Then click on the Export menu item. The dialog box shown will contain a variety of choices to export the image. The two items most important to keep the image a certain pixel size are the File Settings and Image Settings as shown below.


Select the image type to export. Use a JPEG, TIFF or other image type. Note that if you select ORIGINAL, then the Image Settings remain greyed out and cannot be changed. To select the original file type, force the File Settings to that type of image.

Then, using the Image Settings, select the checkbox Resize to Fit and be sure it is set to Width & Height. Then input the same width and height used in the custom crop. For example, input 800 and 600. Be sure the type is set to pixels.

Finally, export the image. This newly created image should be exactly the pixel dimensions input and should, more importantly, retain exactly the cropping that was set in the Develop module.

Conclusion

This method is not limited to pixels. The same concept can be used for inches or centimeters. By choosing the appropriate measurement for the export function that exactly matches the custom crop used, a specific image size can be achieved.

Note that this method also works in the Beta version of Lightroom 2.0. It would be reasonable to expect this will also work in the final version.

... Read More!

Don't forget to visit my photography web site where we sell museum quality black and white prints framed to last up to 175 years - Outdoor Images Fine Art.