Wednesday, April 30, 2008

Library & Catalog Management Workflow

Library & Catalog Management is about maintenance. This workflow involves moving files to permanent storage or on separate hard disk media and maintaining the image and keyword data in the Library. This is part of my Digital Image Workflow. Use the steps below as needed:

  1. Moving Image Files
  2. Periodic Keyword Maintenance
  3. Using a Catalog on another Computer
  4. Using Multiple Catalogs
  5. Catalog and Preview Storage Options
  6. Managing Multiple Sized Images of the same Image File
... Read More!

Don't forget to visit my photography web site where we sell museum quality black and white prints framed to last up to 175 years - Outdoor Images Fine Art.

Lightroom Tip#9 - Using Panels To Conserve Screen Space

There are so many panels available to open in each of the Lightroom modules that your screen can easily begin to resemble the aftermath of a tornado. Keeping too many panels open can also reduce the efficiency of using Lightroom. This Lightroom tip will show you how to use your panels effectively to keep your focus on what you need to work on.

There is a menu item for each panel entitled Solo Mode. This menu item is what controls how many panels can be open on each side of the screen. It operates the same for all of the modules in Lightroom and for any of the panels. When Solo Mode is turned on, then only one panel can be open at a time on that side of the screen. This means clicking on the arrow of a panel or the panel itself, will open that panel and close the previously open panel. There is an example of this further down.

Turning On Solo Mode

Solo Mode can be turned on by right-clicking a panel title in any column of panels. Then select the Solo Mode Item as shown in the image above. Note that this will only turn on the Solo Mode for that column of panels. Each column retains it's own setting so Solo Mode can be active in the Develop Module, but not the Print Module. The other method is to hold the ALT key (Option in Mac) and click on an arrow in one of the panels. To turn off the Solo Mode you must right-click and de-seletct the menu item.

How To Tell If Solo Mode is Active


You can tell if the Solo Mode is active by the style of the arrows in the panel. Notice in this image the arrows are spotted instead of solid. This indicates that Solo Mode is on and only one panel will be open at a time.

Notice how here multiple panels are open causing the need to scroll up and down to see all the available options. Also notice how the arrows on each panel are solid and not spotted. This is an extremely in-efficent mode for many of the panel columns throughout Lightroom. ... Read More!

Don't forget to visit my photography web site where we sell museum quality black and white prints framed to last up to 175 years - Outdoor Images Fine Art.

Pre-Correction Image Workflow

After careful ratings, the best images should be prepared before the correction stage. The Pre-Correction Image workflow applies necessary crops and any touchup required. This is part of my Digital Image Workflow. Follow the steps below:

  1. Cropping an Image for future use
  2. Dust and speck removal
  3. Large scratches and object removal
  4. Red-eye removal
... Read More!

Don't forget to visit my photography web site where we sell museum quality black and white prints framed to last up to 175 years - Outdoor Images Fine Art.

Monday, April 28, 2008

Lightroom Tip#8 - Reseting Development Adjustments

Tweaking development settings in Lightroom is certainly and art and not a science. Somedays certain settings look great and other days the creative part of the brain takes over and we want to adjust an image differently. How do we set all the many sliders back to their default position? See the image below. How did we get the reset option to show?


I have used the reset several times in the tonal curve panel as I try to get the grey tones where I want them. I have also noticed several articles on the web discussing the reset option as it pertains to one panel or another. Thus, I did a test and here are the results.

All of the panels in the develop module have a reset capability. First, hold down the ALT key (Option on a Mac) and hold the mouse cursor over a sub-panel. Notice how the word Reset is inserted in the title at the top. By clicking on this Reset title (Reset Region for example, under the Tone Curve), those settings will be reverted back to the default.

Two items to note: 1) do not confuse this with the RESET button at the bottom of the develop module panels. The RESET button will reset all of the image settings back to default, cropping and the like included. Using the ALT key and clicking on the heading will only reset that small group of settings back to the defaults.

2) The reset option goes back to the default settings, which you can set with the SET DEFAULT button at the bottom of the Develop module panels. To use this button, first make sure all the develop settings are where you want the defaults to be. Then press the ALT key (Option on a Mac) and the RESET button is labeled SET DEFAULT. While the ALT key is held, use the mouse to click on this button saving the defaults.

In an effort to always make our workflow more efficient, the ability to quickly reset some development tweaking and try something new is extremely valuable. Try it until it becomes a habit.
... Read More!

Don't forget to visit my photography web site where we sell museum quality black and white prints framed to last up to 175 years - Outdoor Images Fine Art.

Friday, April 25, 2008

Workaround - Turning Gate Mono Slideshow Autoplay

Lightroom's programming language for web galleries has it's limitations and one we have found is with the autoplay function in the monoslideshow. The Turning Gate has a spectacular template for monoslideshow. Here's the problem and the workaround.

If a monoslide show is playing in the preview window of Lightroom, then the upload to an ftp site will stick at 1% and fail. Unfortunately, when I cancelled the process by clicking in the 'x' next to the bar in the upper left hand corner of Lightroom - it stuck. Everything stopped and the process didn't cancel. I could still use Lightroom, but the process hung around. Even when I closed Lightroom, it asked about stopping the process (I replied, yes).

Thus, the workaround is this: in the Appearance tab under Control Options, set the controls to auto hide as opposed to turning off the show controls checkbox. Then turn on the auto play check box in the Site Info tab under Main Gallery Attributes. Then proceed as normal to upload your slideshow and all should work fine!

Remember, if you get the error, the only way to recover is to close Lightroom and reopen it.
... Read More!

Don't forget to visit my photography web site where we sell museum quality black and white prints framed to last up to 175 years - Outdoor Images Fine Art.

Updated Turning Gate Galleries for Lightroom

The Turning Gate has released new versions of several of the Lightroom Templates with some great improvements. The first and most favorite addition of mine is the addition of a footer.

Matt beat me to this one as I was working on creating a footer for several of his templates when this was released. While this image is from the LR Pages 1.2 template, they are the same in th other templates. Notice how you can choose the color of the text, the font and the font size. You can even input html tags and they will be properly rendered. I have done this with the 'a' tag for hyperlinks so I can direct people to various other pages. Check the box to enable the use of the footer and type something in.

If you haven't looked recently, visit Matt's site and don't forget a donation for his work!
... Read More!

Don't forget to visit my photography web site where we sell museum quality black and white prints framed to last up to 175 years - Outdoor Images Fine Art.

Wish - Alt Key Override in Spot Removal

Adobe Lightroom uses an automatic placement when removing spots in an image. The placement of the sampled area in the image can be adjusted, but for images with a large amount of work, this is very tedious and inefficient. This idea would make spot removal as easy as it is in Photoshop.

This wish would be to have an Alt-key override in the spot removal. We could keep the default behaviour just as it is today. However, if a user were to hold the Alt key down, they could use the first click as a sample location and the second click as the spot to apply the healing. This is the same behaviour in Photoshop and has been proven as a best practice.

I would like to also see behaviour that remembers the offset from the last Alt key press and uses that offset for subsequent healing. However, that may be too much programming for an override process.

In any case, this would be an extremely efficient use and would keep me from feeling the need to export work to Photoshop for spot removal.
... Read More!

Don't forget to visit my photography web site where we sell museum quality black and white prints framed to last up to 175 years - Outdoor Images Fine Art.

Monday, April 21, 2008

Print a Contact Sheet for filing with Negatives

This is part of my Image Conversion Workflow.

Printing a contact sheet is important to help identify the link between the negatvive or slide in storage with the digital image usedy by the computer. If disaster ever strikes, or you are looking for a negative or image, using a properly labeled contact sheet can make the different between a few minutes or a few hours of searching.
Print the contact sheet as scanned in. This would be after any keyword or metadata updates, but before any developing. Using this state of the image will allow viewing of the full image, including imperfections or parts of the negatives.

Printing an image after cropping or enhancing is misleading as to what the negative will show.

If you don't already have a contact sheet template created, see this article on creating a contact sheet for instructions.

Put all contact sheets in archival page protectors, labeling with any additional information necessary and include them in the binders where the negatives or slides are stored. In the case of digital images, use a binder that sits with or next to the DVD and CD storage.
... Read More!

Don't forget to visit my photography web site where we sell museum quality black and white prints framed to last up to 175 years - Outdoor Images Fine Art.

Creating a Custom Contact Sheet in Lightroom


Creating a custom contact sheet like this one is easy to do in Adobe Lightroom. This type of contact sheet is especially important when using our film scanning workflows. We use this contact sheet to easily see what negatives are stored in specific binders allowing easy location of the originals. Here we will show you the steps to create your own contact sheet.

Where to Start

Begin by selecting some images. We use images by selecting a specific file folder where we store our images by either roll of film or roll of slides. See my article on Digital Management of Negatives and Slides.

After selecting some images, move to the print module. There select the lightroom template you wish to start with. We chose the 4x5 Contact Sheet. From there it is all customization.

Customizing the Contact Sheet

First we will set a title for our work. We need to allow room for a title to show, so we set the top margin in the layout tab to 0.75 inches. You can use any size that fits your needs. Then we set an identity plate that includes, most importantly, the file folder for the images. Remember from our workflow that the folder name is the identification for the series of images. In this case, the folder name is 2008-D-1. You can also use a description for the photo shoot if you like.

To change the identity plate, first select the checkbox for the identity plate under the overlays tab. Then click on the little down arrow at the bottom of the plate sample and select the Edit menu. Select the text identity plate option if necessary and type the description. Simply press the ok button without saving the identity plate, because it will change each time.

Next, select the Override Color checkbox and select a black color for the title. Be sure that the Render behind image and Render on every image checkboxes are turned off. Now you will see the identity plate in the middle of your contact sheet. Using the mouse, drag it to the top of the page. By setting your top margin, you should have ample space to show the title.

We also need to add a page number in case there are more images than will fit on a single page. Select the Page Numbers check box under the Page Options after the indentity plate. You should see the number one in the bottom right corner.

The only customization remaining is the text to show under each image. Check the Photo Info box and select the drop down Edit menu item. Here we will add the standard information we would like to see next to each image on the contact sheet.

This should bring up a dialog box similar to the one below. We will enter the filename and other information for each image. Note that you can choose whatever information you like, but you should choose the filename first if you will use the contact sheet as part of your archiving and storage workflow. This will help identify frame numbers and filenames later on.
By selecting information that you wish to show and pressing the insert button, the lightroom codes are input to the top and a sample filename is shown. Notice we use the Filename first and then any exposure information linked to the image. If the image is digital, then the exposure information exists. If you are scanning slides or negatives, this information probably doesn't exist and the filename is sufficient. Notice how we have added labels such as 'exposure' in the template area to describe the information added.

Be sure to press the drop down at the top of the dialog and select the 'Save current settings as New Preset' item. Then name it something meaningful like '4x5 contact sheet info'. Press Done and see what your preview looks like. It should be similar to the one presented at the top here.

Saving the Preset

Almost finished! Let's save what we have so far by adding a template. Press the Add button on the bottom of the left panel and enter a name similar to the one shown here. After you are finished, you can tweak the settings, right-click on the template name and select the 'Update with Current Settings' menu item.

Conclusion

Working with digital images from RAW sources or from negatives and slides still necessitates the printing of contact sheets. Set your up like this and easily add it to your work flow. ... Read More!

Don't forget to visit my photography web site where we sell museum quality black and white prints framed to last up to 175 years - Outdoor Images Fine Art.

Monday, April 14, 2008

Wish - Slideshow Export to DVD or Quicktime

Adobe has made significant advancements in the Beta version of Lightroom 2. One weak area of the program is the Slideshow module which has received a lot of attention during this beta test. The discussion has centered around ways to create better slideshows outside of Lightroom so that they can be viewed without the original computer. While the web module has it's own programming language and third parties have created a multitude of plugins for web work, the Slideshow remains stagnant. There has to be another solution.

How about creating additional exporting options? Instead of Flash, which can be done through the web interface, how about two other mediums: DVD's (CD's) or Quicktime Videos?

Wouldn't it be great to export a slideshow to a DVD and send that as a [b]final product[/b] to someone? They could view the wedding pictures in their album, but also on their TV. Or, you could finish a shoot on location, quickly work up the images and export to a DVD for others to view in the media center that already has a DVD player hooked up. What about sending a movie to a group you went on vacation with? How about charging extra for a video of the images a customer has already paid for in print? The uses are endless.

If straight to a DVD is too dificult to program, how about creating a quicktime or other type of video file such that we could us a third party burning software to create the DVD?

This concept would remove the problems associated with a slideshow in PDF format and make the program all that more useful and portable.

Let me know what you think.
... Read More!

Don't forget to visit my photography web site where we sell museum quality black and white prints framed to last up to 175 years - Outdoor Images Fine Art.

Sunday, April 13, 2008

Lightroom 1.4.1 Update

Ok, I've been out of town and look what happened while I was gone - Adobe released Lightroom 1.4.1 updates for windows and for macintosh are now available. They provide additional camera support and fix the EXIF issuesbrought about by the last update.

You can find the ReadMe file here. The readme file indicates the new update includes all of the previous updates in the Lightroom 1.4 Update previously released.

The readme file also indicates the Identity Plate Bug is still present. If we encounter any problems with this update, we will post them here.
... Read More!

Don't forget to visit my photography web site where we sell museum quality black and white prints framed to last up to 175 years - Outdoor Images Fine Art.

Thursday, April 10, 2008

Wish - Print to Email in Lightroom 2 Beta

I think adding the addition to print to a jpeg is a fantastic idea! Wouldn't it be great to simply add an item allowing us to print to an email?

Since we are on a multi-platform with Lightroom, it could simply call the operating system's email client and prepare the jpeg as an attachment. This would make sending contact sheets and other photos via email very easily accomplished. Besides, going paperless is a great GREEN idea!

Also, for bloggers that use an email account to automatically publish, an email could be sent with the photos to publish them on the web.

Great ideas Adobe! Can we add an email to print??
... Read More!

Don't forget to visit my photography web site where we sell museum quality black and white prints framed to last up to 175 years - Outdoor Images Fine Art.

Wish - Last Date Edited Metadata

There has been siginificant discussion on incremental backups in Lightroom and the need for that ability. I have a solution easy to implement that should work well. If we could add a metadata tag that was the date and time last edited, via development of some kind, or additional of snapshots, etc., then we could filter on that metadata and produce an export to cd or hard drive.

This would enable daily, weekly, or other timespanned backups. It would also leave all the work in lightroom.

What do you think?? Other ideas??
... Read More!

Don't forget to visit my photography web site where we sell museum quality black and white prints framed to last up to 175 years - Outdoor Images Fine Art.

Developed Image Backup in Lightroom

We discussed the backup of images into Lightroom once they were imported. Here we will discuss the backup of images once they have been developed or modified. Based on the volume of discussion in the Ligthroom Forum, we will also discuss whether additional backups are needed, or if these backups contain all the data we need in the even of catastrophe.
When we were backing up our image initially upon import, all we had was an image file to backup. If we were backing up a RAW file, then we performed a slightly different set of steps converting the file to a DNG, or digital negative format by Adobe. Now we are concerned with saving meta data as well as developed information. Below are the steps we have used and the results.

Exporting Developed Images for a Backup

First, we will choose a set of images to backup. This can be a directory, camera, portfolio or the entire ligthroom catalog. Select images in the same manner as you would to do anything else in Lightroom. Then we need to export the images. The setings we use here are particularly important. Since a RAW file contains so much data, we did our testing on a simple jpeg file from a Sony DSC W-7 which is a pocket digital camera. We wanted to use a compressed format knowing that RAW files would probably behave better. See the image below for the export dialog with our settings selected.


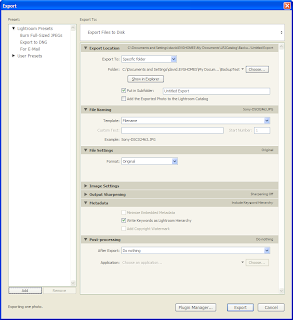
The first item is the export location. This can be a hard disk, temporary space, or some other location available in your computer. If you are storing your backup on a hard drive, choose this location, otherwise choose a temporary space to burn the images to a cd.

Next we set the filenaming. This is important so that we do not loose the original filenaming. If you are like me, you have adjusted the filename slightly because you have more than one import source - negatives and a digital camera or two digial cameras. Thus, you must choose Filename as the method for file naming this export. This selection leaves the filename exactly as it is with no modification, you have already modified it.

Next is the file settings. Lightroom defaults to the type of file that your image really is. In my case it defaulted to JPEG. Change this file type to original, especially if it is not a RAW file, otherwise some additional processing may ocurr and the results may not be your native, virgin file. Choosing the original file type disallows any Image Settings and Output Sharpening, which is what we want.

Next I choose to write the keywords as a lightroom hierarchy by selecting the checkbox. This ensures the keywords are stored with the image and I have spent significant time in my workflow setting keywords.

Finally, we set the post processing. In this test case I used do nothing, but in a real backup I would choose Burn Exported Images to a Disc.

Then we press the export button and wait for the backup to complete.

Testing the Backup

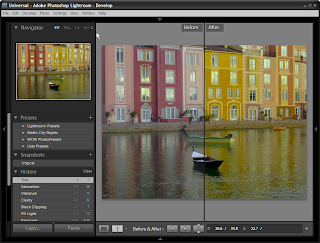
No backup routine is worthwhile unless it is tested. Here are the results of my testing a developed image backup. The first image shows a comparison in the develop module of an image. Notice there are clearly color enhancements to the image. Also note the library name at the top of the window is Universal. This is the image I exported using the settings above.


Next, I created a new, empty catalog in Lightroom and imported the image that was exported. See the window below for the results after opening the develop module and selecting compare.


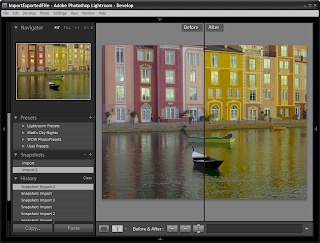
Notice several items. First, the title on the window indicates a new catalog, not the same one we used to export. This is an important step of the test to be sure no information left behind is used. We want to know if catastrophe strikes and we start from scratch what we will get. A better test would be to use a new computer with a new install, but this should provide accurate results as well.

Second, notice that the compare clearly shows adjustments to the image, which is what we expect. However, also notice that the original, untouched image is also available. See the snapshots panel on the left side. Notice that we have two snapshots. One is labeled import which is the original import and one is labeled import2 which is the second import done at the restore of the backup.

Conclusion

Several items worth noting. The settings for development adjustments are saved on an export as is the original image. The steps have been cleared however, and I can live with that. The original file is saved intact which is important to me.

Further testing must be done which I will post here on checking: 1) the metadata saved, 2) the keywords saved and 3) multiple snapshots saved.

Finally, several items will be given. One, the folder location will be different upon restore unless care is made to restore to the original folder locations before the backup was made. I can live with that and if good paper records are maintained, restoring to original locations will not be a problem. Second, the catalog previews will need rebuilt. I can also live with that because there is a tradeoff between storing thumbnails for thousands of images and rebuilding them. A restore will take considerable time and waiting for thumbnails is fine with me knowing I have all the information backed up I need to get to my starting point.

The conclusion? There are many different backup routines available as third parties. However, Lightroom provides a backup routine that can be used in our workflow that will work with minimal effort. It keeps all the information we need without losing original images and that is what we have to have. Everything else is icing on the cake and available with other programs and different workflows. The choice is yours, just remember to TEST, TEST, TEST.

Lightroom 2 Beta

The steps here have been confirmed with Lightroom 2 Beta and work the same producing the same results. ... Read More!

Don't forget to visit my photography web site where we sell museum quality black and white prints framed to last up to 175 years - Outdoor Images Fine Art.

Saturday, April 5, 2008

Lightroom 2 Beta - Where to Give Adobe Feedback

We need to know where to give Adobe feedback on this first beta release of Lightroom 2. They have setup a special forum at this location in order to take feedback: follow this link to get to the forum. By leaving comments, we can all contribute to the improvement of version 2! ... Read More!

Don't forget to visit my photography web site where we sell museum quality black and white prints framed to last up to 175 years - Outdoor Images Fine Art.

Wish - Detail Panel needs more flexible adjustment for screen size

Lightroom 2 Beta has a new Detail panel under the development module. The panel has been redesigned in an extremely positive way. We now have a small zoom window that is already at 1:1 so that we can view noise and sharpening changes without adjusting our main view. Also added is a much anticipated chromatic aberration section in between the noise and sharpening areas.

My wish is this: we need to find a way to show the entire detail section, by default in the development window. See the image below from a 20 inch monitor. The default setup for the development module doesn't allow the entire detail panel to show at one time.

Other panels have the same issue, but it is much less important than the Detail panel. With the addition of the thumbnail, your attention is on this area while you are adjusting sliders. It is difficult to see the results of the detail and masking sliders with only part of the preview showing.

Granted, Lightroom is so flexible that you can adjust the size of the panel at the bottom, or even hide it which gives plenty of room. The principle should be, however, that the default setup gives you most of what you need.

I think the fix here is simple and would add value no matter what screen size you have. If Adobe would take the three slider sections of the detail window and allow you to shift between each slider section, similar to the HSL / Color / Grayscale panel, two benefits would result:

1. each of the sliders: noise, chromatic aberration and sharpening, could be right underneath the thumbnail allowing efficient view and adjustment of the image (see example below), and
2. the entire area you are working on in the detail panel would be visible in the default development module setup.

I created a view to show what I would like to see. The first image is with the noise reduction selected:

This second image would be with the sharpening selected.

Notice how in each image the section we are working with is directly under the preview window. The alt key could still be held down and the masking and detail previews would show. I think this would be more efficient and more beneficial to a large number of people.

Give me your thoughts and let me know if you think this would be a valuable change as well.

... Read More!

Don't forget to visit my photography web site where we sell museum quality black and white prints framed to last up to 175 years - Outdoor Images Fine Art.

Lightroom 2 Beta Release 439142 Wish List

Adobe Lightroom 2 Beta has greatly enhanced the workflow and efficiency for digital photography and Beta releases tend to have work that still needs done. Below I am starting my list of wishes based on this first public Beta release. Feel free to comment and keep watching, I'll add more here!

Below is my wishlist for Lightroom 2 Beta 439142:


Click on each item above to see more about that wish. Let me know what you think too!

... Read More!

Don't forget to visit my photography web site where we sell museum quality black and white prints framed to last up to 175 years - Outdoor Images Fine Art.

Thursday, April 3, 2008

Lightroom 2 Beta Keeps Existing Settings

Adobe did a great job with continued upgrade support, even when you keep an old version on your machine. After installing version 2.0 beta, I found an interesting and very good side effect.

All my settings, templates and presets from version 1.3 were available in 2.0! This makes testing the beta that much easier!

I'm working on getting some images in a library and I'll keep you updated with some Library and Develop module information! The interface looks great and I can already tell there are some fantastic additions.
... Read More!

Don't forget to visit my photography web site where we sell museum quality black and white prints framed to last up to 175 years - Outdoor Images Fine Art.

Lightroom 2 Beta Installation

The installation of Lightroom 2 Beta was easy and went without a hitch. I wanted to be sure that I could operate the beta version along side the current stable 1.3 version and this is what I did.

I followed the installation prompts as Adobe set them out. Fortunately, Adobe defaulted the installation to a unique directory. Be sure to keep the installation out of your current working version or you will overwrite your working copy.

Another plus, was not having to worry about entering authorization codes. Since I have version 1.3 already installed on my machine, installing version 2.0 copied the files and then left us ready to go!

I have had zero problems running both version 1.3 and version 2.0 beta side by side, although not at the same time. You can run one version at a time, but I haven't found a way to run two versions simultaneously. Even clicking on the program icon will not start a second session with a different version. I'm sure this is by design.

More to come!

... Read More!

Don't forget to visit my photography web site where we sell museum quality black and white prints framed to last up to 175 years - Outdoor Images Fine Art.

Lightroom 2 Beta - Cannot Import Catalogs Yet


I was hoping to begin a review of Lightroom 2 Beta today by importing my catalog from version 1.3. Unfortunately, that feature isn't available yet. If you use the File, Import Catalog menu and choose a catalog file that is created in a version less than 2.0, then you get the dialog box above.

I guess I will import whatever pictures I currently have on my digital camera and go from there! I will post more in the upcomming days.
... Read More!

Don't forget to visit my photography web site where we sell museum quality black and white prints framed to last up to 175 years - Outdoor Images Fine Art.

Wednesday, April 2, 2008

Adobe Lightroom Version 2.0 Beta is Here!

Adobe has announced the release of a beta version for Lightroom 2.0! More importantly is the availability of the Beta to the public in general. As a registered Lightroom user you can use your existing key to install the Beta, which runs through August 2008. You can download the Beta version here at Adobe Labs and try it out.

There has been significant chatter since this release and a few of the new items are very interesting. However, the question begs: Will Adobe still work on and release version 1.4 (1.5??) to fix the last patch that had such big meta data problems? Or, will Adobe focus on 2.0?

Some of the great new enhancements in store for 2.0 include:


  • Two monitor support (where has this been!)

  • Tremendous upgrades to the slideshow and web gallery routines making them more efficient to use (they are already)

  • REAL sharpening on the print module


These are just a few of the items, view the Release Notes in order to see more.

I am downloading a copy now and will let you know what I find! ... Read More!

Don't forget to visit my photography web site where we sell museum quality black and white prints framed to last up to 175 years - Outdoor Images Fine Art.